I was standing in the baking aisle of a grocery store last October, staring at a bag of chocolate chips, when a memory hit me so hard I almost laughed out loud. It was a Tuesday afternoon, the fluorescent lights were humming, and someone’s cart had a squeaky wheel. And then I was seven years old, sitting cross-legged on my aunt’s linoleum kitchen floor, watching her pipe meringue onto a baking sheet. She called them “little ghosts,” and I thought she was magic.
My Aunt Carol wasn’t a professional baker or anything. She was just the kind of person who made holidays feel special with whatever she had in the pantry. That day, she had eggs, sugar, and a half-empty bag of chocolate chips. I remember the way the meringue felt when I accidentally touched it—sticky and cool, like a secret. She let me place the chocolate chip eyes, and I was so careful, pressing them in with my tiny fingers. She passed away a few years ago, and honestly, I haven’t thought about that afternoon in forever.
But there I was, in the baking aisle, feeling that exact same quiet excitement. Maybe you’ve had that feeling—when a random smell or sight pulls you right back to a specific moment. You know the one. I grabbed the chocolate chips, and I mean, I practically ran home. I needed to make those adorable ghost meringue cookies again. I needed to see if I could get them right.
The first batch I made looked like sad, lumpy clouds. The second batch had eyes that melted into nothing. But the third batch? They were perfect. These little ghosts are exactly what I remember—crisp on the outside, light as air on the inside, with those dark chocolate chip eyes staring back at you. They’re a little bit spooky, a whole lot adorable, and they taste like a memory I can finally hold onto.
Why You’ll Love This Recipe
Look, I’ve tested this recipe about six times now, and I’m not ashamed to admit that the first two tries were a mess. But that’s exactly why I can tell you with confidence—these adorable ghost meringue cookies work. They are the kind of treat that makes people stop and smile before they even take a bite.
- So Simple, It’s Almost Foolproof : You only need four basic ingredients. Eggs, sugar, vanilla, and chocolate chips. That’s it. No fancy extracts, no special flours, no trips to three different stores.
- Naturally Gluten-Free and Low-Fat : Meringue is basically just egg whites and sugar. So if you’re hosting friends with dietary restrictions, these are a total win. Everyone can have one.
- Perfect for Halloween Gatherings : I made these for a potluck last weekend, and they were gone in fifteen minutes. People were literally taking photos before eating them. They’re that cute.
- Make-Ahead Magic : You can pipe these little guys a day or two before your party. Just store them in an airtight container, and they stay perfectly crisp. One less thing to stress about when guests arrive.
- Unbelievably Impressive for How Easy They Are : I mean, let’s be honest—when you show up with a platter of ghost-shaped cookies, people think you spent hours. You didn’t. But you don’t have to tell them that.
What makes these different from other meringue cookies is the texture. I’ve had meringues that were chewy or sticky or just plain sad. These come out perfectly crisp and light every single time. The secret is in the technique—beating the egg whites to stiff peaks and baking them low and slow. And those chocolate chip eyes? They stay put if you press them in at just the right moment. No melting, no sliding off. Just perfect little ghost faces.
This recipe isn’t just good—it is the kind that makes you close your eyes after the first bite. It’s a little bit of childhood, a little bit of Halloween magic, and a whole lot of delicious. Perfect for impressing your guests without any stress.
What Ingredients You Will Need
This recipe uses simple, wholesome ingredients to create something that looks like it came from a fancy bakery. The magic is in the technique, not the shopping list. Here is everything you need, and a few notes on what to look for.
- 3 large egg whites (room temperature is key here—cold eggs don’t whip up as well. Leave them on the counter for about 30 minutes before you start)
- 3/4 cup granulated sugar (150 grams. I use regular white sugar. Don’t swap this for powdered sugar or brown sugar—the texture won’t be right)
- 1/4 teaspoon cream of tartar (this stabilizes the egg whites and helps them hold their shape. You can substitute with 1/2 teaspoon of lemon juice or white vinegar if you don’t have it)
- 1/2 teaspoon vanilla extract (pure vanilla is better, but imitation works fine too. I personally love Nielsen-Massey for the flavor)
- 1/4 cup mini chocolate chips (about 60 grams. You need mini ones for the eyes—regular chips are too heavy and will sink. I recommend Guittard mini chips because they hold their shape well)
- Pinch of salt (just a tiny one—it balances the sweetness)
Ingredient Selection Tips:
For the best results, use eggs that are at least a few days old. Fresh eggs have thicker whites that are harder to whip. I know that sounds counterintuitive, but it’s true. If your eggs are super fresh, just let them sit out a little longer.
The sugar matters more than you think. Granulated sugar dissolves best into the egg whites. If you use superfine sugar, it works even faster. You can make your own by pulsing regular sugar in a food processor for a few seconds.
For the chocolate chips, I’ve tried both regular and mini. Regular chips are just too heavy. They sink to the bottom of the meringue and sometimes fall off entirely. Mini chips stay put and look more like cute little eyes. If you’re feeling fancy, you can use black cocoa powder to make the meringue itself look darker and spookier, but that’s totally optional.
Substitution Guidance:
- No cream of tartar? Use 1/2 teaspoon lemon juice or white vinegar.
- Need it vegan? You can use aquafaba (the liquid from a can of chickpeas) instead of egg whites. Use 3 tablespoons of aquafaba per egg white. It whips up beautifully.
- Want to skip the chocolate? Use a tiny dab of black gel food coloring to paint on eyes after baking.
Equipment Needed
You don’t need much for these adorable ghost meringue cookies, which is part of the beauty. Here is what you will need, plus a few notes from my own kitchen.
- Electric mixer (handheld or stand mixer works. I’ve made these with both, and honestly, a handheld is easier for small batches. My KitchenAid stand mixer gets the job done faster, but it’s not necessary)
- Large mixing bowl (glass or metal is best. Plastic bowls can hold onto grease, which will ruin your meringue)
- Baking sheet (a standard half-sheet pan works perfectly)
- Parchment paper (don’t skip this—the meringues will stick to a greased pan)
- Piping bag with a round tip (I use a Wilton 1A tip. If you don’t have a piping bag, you can use a zip-top bag with the corner snipped off. It won’t be as precise, but it works in a pinch)
- Spatula (a silicone one is best for folding)
- Cooling rack (for letting the cookies cool completely)
If you don’t have a piping bag, I’ve also just used a small spoon to dollop the meringue into ghost shapes. They come out more rustic, but honestly, rustic ghosts are still adorable. Just make sure your bowl and beaters are completely clean and dry. Any trace of grease or yolk will stop your egg whites from whipping up.
Preparation Method
Let me walk you through this step by step. I’ve made mistakes so you don’t have to. Follow these instructions, and you will have perfect little ghosts.
- Preheat your oven to 200°F (93°C). Yes, that low. We are drying these out, not baking them. Line a baking sheet with parchment paper. Set aside.
- Separate your eggs carefully. This is the most important step. Any bit of yolk in your whites will stop them from whipping. I crack each egg into a small bowl first, then transfer the white to your main bowl. That way, if one yolk breaks, you haven’t ruined the whole batch. I learned this the hard way after wasting a dozen eggs.
- Start whipping the egg whites on medium speed. Once they get foamy—about 30 seconds—add the cream of tartar and salt. Continue whipping until soft peaks form. You’ll know this stage when you lift the beater and the peak flops over.
- Start adding the sugar, one tablespoon at a time. This is the slow part. Add a spoonful, let it mix in for about 15 seconds, then add the next. If you dump all the sugar in at once, the meringue will deflate. I usually set a timer for this step—it takes about 5 minutes total.
- Add the vanilla extract. Drizzle it in while the mixer is running on low speed.
- Keep whipping on high speed until stiff peaks form. This takes another 3-5 minutes. You’ll know it’s ready when you lift the beater and the peak stands straight up without drooping. The mixture should look glossy and feel smooth, not grainy. Rub a little between your fingers—if it feels gritty, keep whipping.
- Transfer the meringue to your piping bag. If you’re using a zip-top bag, snip about 1/2 inch off one corner. Twist the top of the bag to push the meringue down toward the tip.
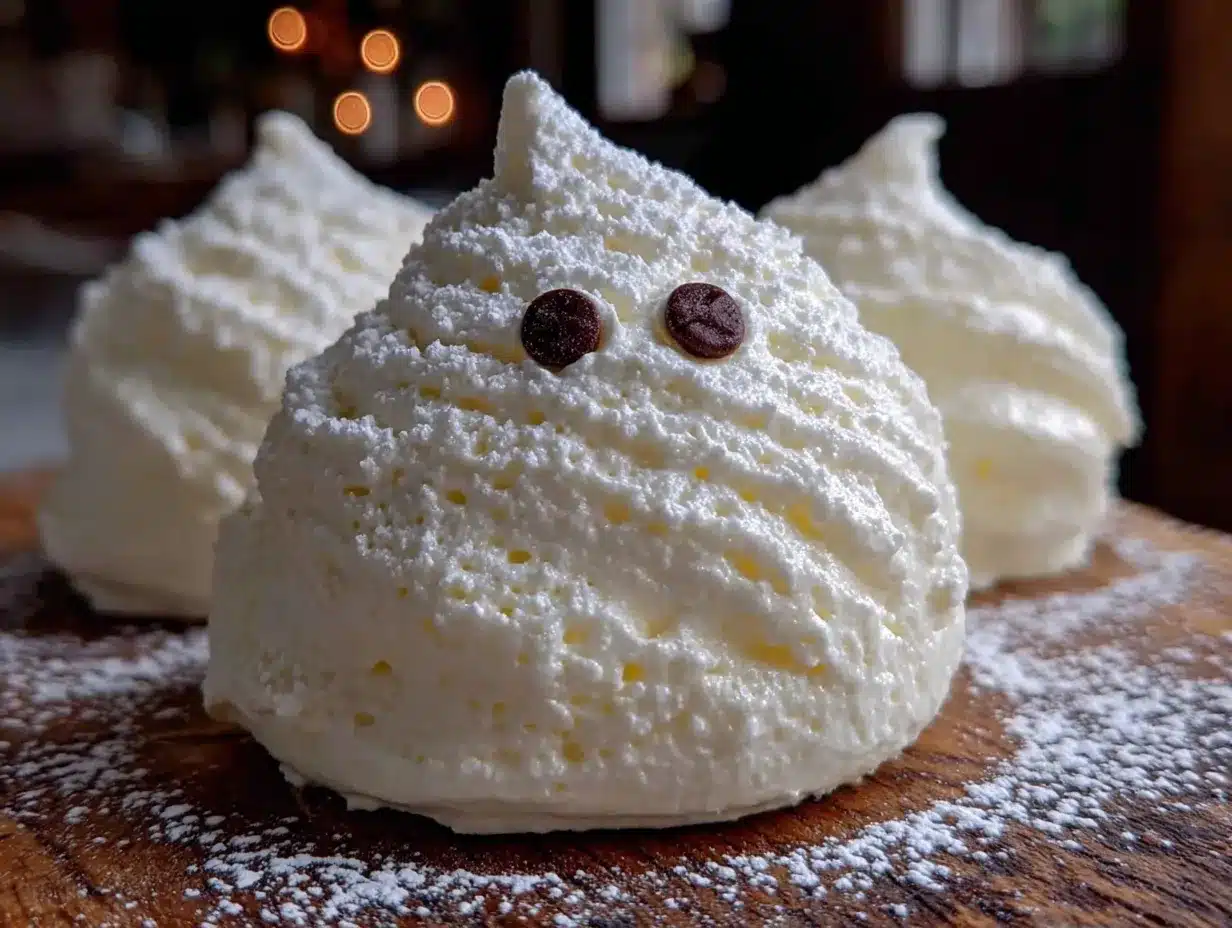
- Pipe ghost shapes onto the parchment paper. Hold the bag straight up and squeeze a round base, then pull upward while reducing pressure to create a teardrop shape. For the head, just squeeze a small round blob on top. They don’t have to be perfect—each ghost has its own personality. Leave about 1 inch between each one because they don’t spread much.
- Add the chocolate chip eyes immediately. While the meringue is still wet, gently press two mini chocolate chips into each ghost for eyes. Don’t push too hard or you’ll deflate them. Just a gentle press until they stick.
- Bake for 1 hour and 15 minutes. Do not open the oven door during this time. The steam will ruin them. After 75 minutes, turn the oven off but leave the cookies inside for another 30 minutes. Let them cool completely in the closed oven.
- Remove from the oven and let cool completely on the baking sheet. They should lift easily off the parchment paper. If they stick, they need more drying time. Pop them back in the turned-off oven for another 15 minutes.
Sensory Cues: When they’re done, the meringues should sound hollow when tapped on the bottom. They should be completely dry to the touch, not sticky at all. The chocolate chips should be firmly set. And honestly, they should look exactly like tiny ghosts staring up at you.
Cooking Tips & Techniques
I have made every mistake in the book with meringue, so let me save you the trouble. Here are the things I wish someone had told me.
Humidity is your enemy. Meringue does not like humid days. The sugar absorbs moisture from the air, and your cookies will end up sticky and chewy instead of crisp and light. If it’s raining or super humid, just wait for a drier day. I tried making these during a summer thunderstorm, and they never crisped up. Total waste of eggs.
Room temperature eggs are non-negotiable. I know I said this already, but I’m saying it again because I’ve ruined batches with cold eggs. Cold egg whites don’t whip up as high or as stable. Leave them out for at least 30 minutes. If you’re in a rush, place the eggs in a bowl of warm water for 5 minutes.
Don’t overmix after adding sugar. Once you’ve reached stiff peaks, stop. If you keep mixing, the meringue will start to separate and look grainy. You’ll see tiny bubbles forming, and the mixture will lose its glossy shine. That’s when you know you’ve gone too far.
Pipe with confidence. The first time I tried piping ghosts, I was too tentative and they came out looking like blobs. Just squeeze firmly and pull up quickly. If you mess up, just scrape the meringue back into the bowl and start over. It’s totally fine to re-pipe.
Timing is everything. I usually prep these the day before my party. I pipe them, bake them, and let them cool in the oven overnight. Then I store them in an airtight container. They stay perfectly crisp for up to a week. Just don’t refrigerate them—the moisture will ruin the texture.
Variations & Adaptations
These adorable ghost meringue cookies are a blank canvas. Here are a few ways to make them your own.
- Spooky Black Meringues: Add a tablespoon of black cocoa powder to the sugar before whipping. The meringue will turn a dark gray color, and the ghosts will look like they came out of a haunted house. I tried this last year, and they were a huge hit at a Halloween party.
- Peppermint Ghosts: Substitute the vanilla extract with peppermint extract. Add a drop of green food coloring for a festive twist. These are perfect for Christmas gatherings, not just Halloween.
- Vegan Aquafaba Ghosts: Use 3 tablespoons of aquafaba per egg white. Whip it exactly the same way. It takes a little longer to reach stiff peaks, but it works. I’ve tested this, and honestly, you can’t tell the difference.
- Pumpkin Spice Ghosts: Add 1/2 teaspoon of pumpkin pie spice to the sugar before whipping. The flavor is subtle but perfect for fall. Top with a tiny sprinkle of cinnamon before baking.
- Mini Ghosts for Kids: Pipe smaller ghosts—about half the size—and use even smaller chocolate chips. Kids love them because they’re bite-sized and not too sweet.
My personal favorite variation is the black cocoa version. It makes the ghosts look genuinely spooky, and the flavor is like an Oreo meringue. I made them for a friend’s Halloween party, and people kept asking where I bought them.
Serving & Storage Suggestions
These ghosts are best served at room temperature. They should be perfectly crisp and light, almost like a cloud that melts in your mouth. The chocolate chips add a nice little pop of richness.
Presentation Tips for Hosting:
Arrange them on a dark platter or a black cake stand for maximum spooky effect. I like to scatter a few around a Halloween dessert table, or pile them high in a glass jar. They look amazing next to a bowl of candy corn or some pumpkin-shaped cookies. For a dinner party, place one or two on each dessert plate as a little surprise.
What to Serve Alongside:
These pair beautifully with hot chocolate, coffee, or even a glass of cold milk. If you’re serving a full dessert spread, they’re great alongside a rich chocolate cake or a pumpkin pie. The lightness of the meringue balances out heavier desserts.
Storage Instructions:
Store the cookies in an airtight container at room temperature. Do not refrigerate them—the moisture will make them sticky. They will stay fresh for up to one week. If they lose their crispness, you can pop them back in a 200°F oven for 10 minutes to dry them out again.
Can You Freeze Them?
Yes, but with caution. Place them in a single layer in a freezer-safe container with parchment paper between layers. Freeze for up to 3 months. Thaw at room temperature for about 30 minutes before serving. They might lose a little bit of their crispness, but they’re still delicious.
Flavor Development:
Honestly, these taste best the day they’re made. The texture is perfect, and the chocolate chips are still snappy. After a day or two, the meringue starts to absorb a tiny bit of moisture from the air, but they’re still good for about a week.
Nutritional Information & Benefits
Per cookie (based on a batch of 24): Approximately 25 calories, 0.5g fat, 5g carbohydrates, 0.5g protein. These are a light, guilt-free treat compared to most cookies. The exact numbers will vary based on the size of your ghosts and how many chocolate chips you use.
Health Benefits:
- Low in calories: At about 25 calories per cookie, you can enjoy a few without any guilt.
- Gluten-free: No flour means these are safe for anyone with gluten sensitivities.
- Low in fat: The only fat comes from the chocolate chips, which you can minimize or skip entirely.
- Good source of protein: Egg whites are pure protein, so you’re getting a tiny boost with each cookie.
Dietary Considerations:
These are naturally gluten-free and low-fat. For a vegan version, use aquafaba. For a sugar-free version, you can try using a granulated monk fruit sweetener, but I haven’t tested that myself. Let me know if you try it!
Potential Allergens:
Eggs and dairy (from the chocolate chips). Use dairy-free chocolate chips for a vegan-friendly option.
I personally love that these cookies let me enjoy a sweet treat without feeling like I’ve derailed my whole day. They’re light, airy, and just enough to satisfy that sugar craving.
Conclusion
These adorable ghost meringue cookies are more than just a Halloween treat. They are a little piece of nostalgia, a fun project to make with kids, and a show-stopping dessert for any fall gathering. I’ve made them for potlucks, dinner parties, and quiet nights at home, and they never fail to bring a smile to people’s faces.
I hope you give them a try. Don’t stress about making them perfect—my first batch looked like sad blobs, and they still tasted amazing. Just have fun with it. Let the kids pipe their own ghosts. Experiment with different flavors. Make them your own.
If you do make these, I would love to hear about it. Drop a comment below and tell me how they turned out. Did you try a fun variation? Did your guests love them? Share a photo on Pinterest and tag me—I can’t wait to see your creations.
Happy baking, and may your ghosts be perfectly spooky and sweet.
Frequently Asked Questions
Can I make these ghost meringue cookies ahead of time?
Absolutely! You can pipe and bake them up to a week in advance. Just store them in an airtight container at room temperature. They stay perfectly crisp.
Why did my meringue turn out sticky?
This usually happens on humid days. The sugar absorbs moisture from the air. Try baking on a dry day, or make sure your oven is completely preheated before you put them in.
Can I use a different type of chocolate for the eyes?
Yes! Mini chocolate chips work best because they’re light enough to stay put. But you can also use mini M&Ms, chopped dark chocolate, or even a tiny dab of black gel food coloring.
How do I know when the meringues are done?
They should lift easily off the parchment paper and sound hollow when tapped on the bottom. If they stick, they need more drying time. Just leave them in the turned-off oven for another 15 minutes.
Can I make these without a piping bag?
Definitely. Use a zip-top bag with the corner snipped off. Or just use a small spoon to dollop the meringue into ghost shapes. They’ll be more rustic, but still delicious and adorable.
Pin This Recipe!
Adorable Ghost Meringue Cookies with Chocolate Chip Eyes
These adorable ghost meringue cookies are crisp on the outside, light as air on the inside, with dark chocolate chip eyes. They’re a little bit spooky, a whole lot adorable, and perfect for Halloween or any fall gathering.
- Prep Time: 20 minutes
- Cook Time: 1 hour 15 minutes
- Total Time: 2 hours 5 minutes
- Yield: 24 cookies 1x
- Category: Dessert
- Cuisine: American
Ingredients
- 3 large egg whites (room temperature)
- 3/4 cup granulated sugar (150 grams)
- 1/4 teaspoon cream of tartar
- 1/2 teaspoon vanilla extract
- 1/4 cup mini chocolate chips (about 60 grams)
- Pinch of salt
Instructions
- Preheat your oven to 200°F (93°C). Line a baking sheet with parchment paper.
- Separate your eggs carefully, ensuring no yolk gets into the whites.
- Start whipping the egg whites on medium speed until foamy (about 30 seconds). Add cream of tartar and salt. Continue whipping until soft peaks form.
- Add the sugar one tablespoon at a time, letting each spoonful mix in for about 15 seconds before adding the next.
- Add the vanilla extract while the mixer is running on low speed.
- Keep whipping on high speed until stiff peaks form (3-5 minutes). The mixture should be glossy and smooth.
- Transfer the meringue to a piping bag fitted with a round tip (or a zip-top bag with the corner snipped off).
- Pipe ghost shapes onto the parchment paper: squeeze a round base, then pull upward while reducing pressure to create a teardrop shape. Add a small round blob on top for the head.
- Immediately press two mini chocolate chips into each ghost for eyes, gently so they stick.
- Bake for 1 hour and 15 minutes. Do not open the oven door during baking.
- Turn off the oven and leave the cookies inside for another 30 minutes to cool completely.
- Remove from the oven and let cool completely on the baking sheet. They should lift easily off the parchment paper.
Notes
Humidity can affect meringue; avoid making on humid days. Room temperature eggs are essential. Do not overmix after adding sugar. Pipe with confidence; you can scrape and re-pipe if needed. Store in an airtight container at room temperature for up to a week. Do not refrigerate.
Nutrition
- Serving Size: 1 cookie
- Calories: 25
- Sugar: 5
- Sodium: 10
- Fat: 0.5
- Saturated Fat: 0.3
- Carbohydrates: 5
- Protein: 0.5
Keywords: ghost meringue cookies, Halloween cookies, meringue cookies, gluten-free cookies, low-fat cookies, chocolate chip meringue



