It was 10:47 PM on a drizzly Wednesday in late October, and I was staring into the fridge with the kind of tired desperation that only a parent of a preschooler understands. We had pizza dough rising on the counter from a failed attempt at calzones earlier that week, a half-empty bag of shredded mozzarella, and exactly one package of pepperoni left from the last grocery run. My kid had been asking for “something scary” for dinner for three days straight, but every spooky recipe I found online called for black food coloring or squid ink or some other thing I definitely did not have.
Honestly, I was this close to just ordering delivery when my eyes landed on the pepperoni. And then, like a weird little lightbulb flickering on at 11 PM, I thought: what if the pepperoni were legs? I grabbed a knife, sliced a few pieces into strips, and started arranging them on the dough like a spider. My husband walked in, saw me hunched over the counter at midnight arranging meat in a radial pattern, and just quietly backed out of the room. Let me tell you, that pizza came out of the oven looking ridiculous and wonderful. The cheese stretched into messy webs, the pepperoni legs curled up in the heat, and my kid literally gasped when he saw it the next morning. I have made this pizza at least eight times since that night, and it never gets old. Maybe you have been there too—standing in your kitchen at a weird hour, trying to make something magical out of nothing much.
Why You Will Love This Recipe
Look, I have tested a lot of “fun” kid dinners over the years. Some were disasters. This one is the real deal. Here is why this Kid-Approved Spooky Spiderweb Pizza with Pepperoni Legs belongs in your weekly rotation, especially during the Halloween season or any time you need a little magic at the table.
- Quick and Easy: From fridge to table in under 30 minutes. No fancy techniques, no special tools. Just pizza, but spooky.
- Simple Ingredients: You probably already have everything in your kitchen right now. Pizza dough, sauce, cheese, pepperoni. That is it.
- Perfect for Picky Eaters: This is still just pizza. The spider legs are pepperoni. The web is cheese. Kids who refuse anything “weird” will still eat this because it tastes exactly like the pizza they already love.
- Crowd-Pleaser: I have brought this to playdates, birthday parties, and even a grown-up Halloween gathering. The adults went nuts for it too. Something about the spider shape makes everyone smile.
- Unbelievably Delicious: The pepperoni gets crispy around the edges while the cheese stays gooey. The spiderweb effect is not just for show—those thin cheese strands get golden and almost caramelized in spots. It is next-level comfort food hiding in a silly costume.
What makes this recipe different from every other spider pizza out there? It is the technique. Most recipes just arrange pepperoni slices on top of the cheese and call it a day. I have learned that cutting the pepperoni into thin strips and tucking them under the cheese creates legs that actually stay attached and curl up beautifully during baking. The spiderweb is made by drizzling extra sauce in concentric circles and dragging a knife through it—no piping bags, no special tools. It is the kind of clever shortcut that makes you feel like a kitchen genius without actually doing any extra work.
This recipe is not just good. It is the kind that makes your kid close their eyes after the first bite and whisper “this is the best dinner ever.” It is comfort food reimagined—silly, spooky, but with the same soul-soothing satisfaction as a classic pepperoni pizza. Perfect for impressing your kids without stress, or turning a regular Tuesday into something memorable.
What Ingredients You Will Need
This recipe uses simple, pantry-friendly ingredients to deliver big flavor and maximum fun without any fuss. Here is everything you need to make your own Kid-Approved Spooky Spiderweb Pizza with Pepperoni Legs.
For the Pizza Base
- 1 pound store-bought or homemade pizza dough (I prefer the fresh dough from my local grocery store bakery—it is cheap and works perfectly)
- 1/2 cup pizza sauce (use your favorite jarred sauce or make a quick version with canned crushed tomatoes and Italian seasoning)
- 2 cups shredded whole-milk mozzarella cheese (low-moisture, part-skim works too, but whole milk gives better stretch for the spiderweb effect)
- 1 tablespoon olive oil (for brushing the crust, adds that golden, bakery-style finish)
- 1/4 teaspoon garlic powder (optional, but I always add it to the sauce for extra flavor)
For the Spider and Legs
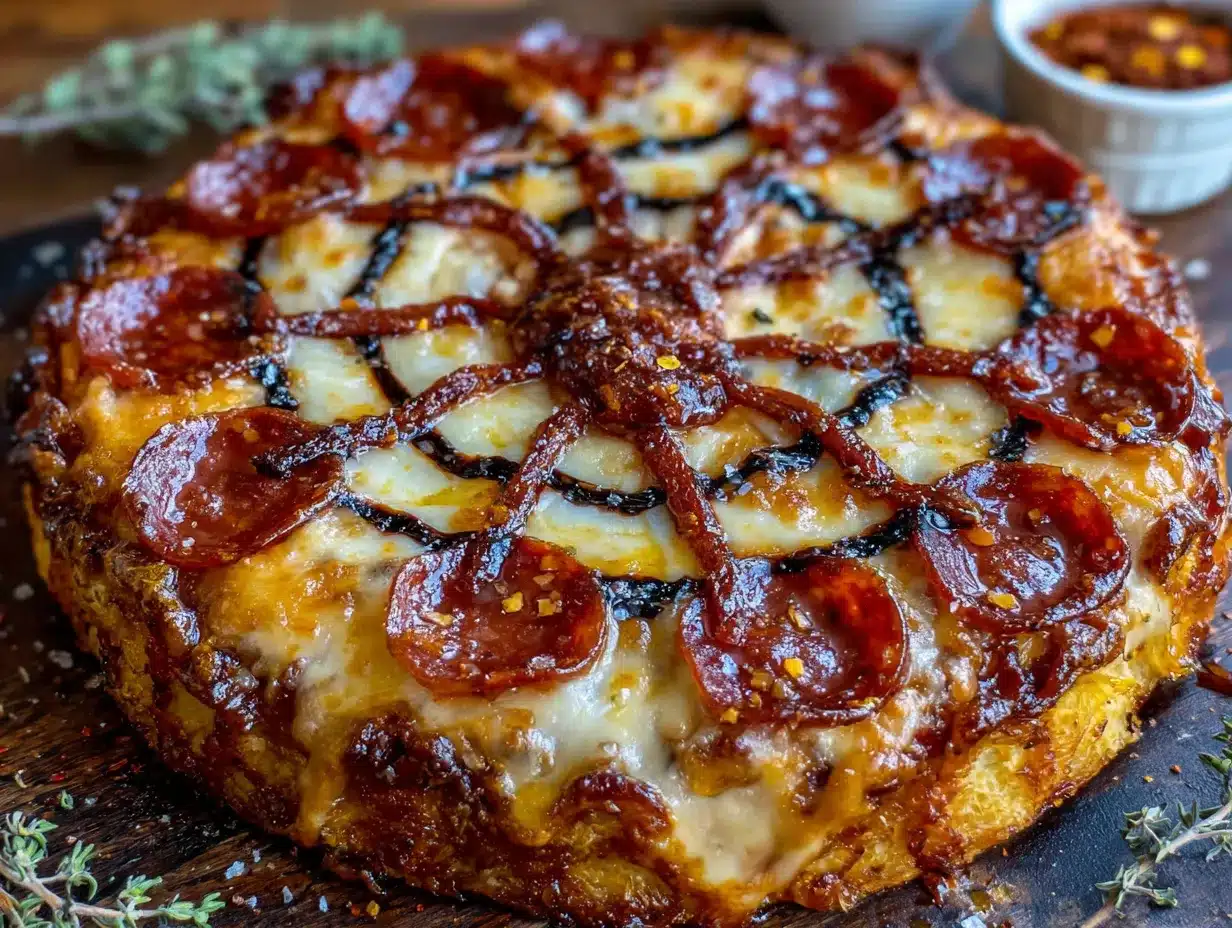
- 8 to 10 slices of pepperoni (look for standard-sized slices, not the mini ones—you need enough surface area to cut legs)
- 2 small black olives (for the spider’s eyes—use canned sliced olives and pick out two round pieces, or use whole olives and slice them yourself)
Ingredient Tips and Substitutions
I have made this pizza so many times that I have learned a few things about ingredient choices. For the dough, I really recommend getting fresh dough from a pizzeria or grocery store bakery if you can. It is usually under two dollars and tastes way better than the canned stuff. If you only have pre-made crusts like Boboli, those work too—just reduce the baking time by a few minutes since they are already partially cooked.
For the cheese, do not use pre-shredded cheese from a bag if you can help it. I know it is convenient, but those bags have anti-caking powders that prevent the cheese from melting into those beautiful, stretchy strands you want for the spiderweb. Buy a block of mozzarella and shred it yourself. It takes two extra minutes and makes a huge difference.
The pepperoni is the star of the show here. I recommend getting a good quality pepperoni from the deli counter rather than the pre-packaged sticks. The slices are bigger and more uniform, which makes cutting the legs much easier. If your family prefers turkey pepperoni or a vegetarian option, those work fine too—just know they might not curl up quite as dramatically during baking.
For the black olives, I have used both canned sliced olives and whole olives. The whole olives look more authentic for the spider body, but sliced olives are easier to find and cheaper. Just pick out the roundest slices for the eyes and use the rest for something else.
Equipment Needed
You do not need any special equipment for this recipe, which is honestly one of the best things about it. Here is what you will need:
- Baking sheet or pizza pan (a standard 12-inch round pizza pan works great, but a rectangular baking sheet works too—just shape your dough to fit)
- Parchment paper (optional but highly recommended—makes cleanup so much easier and prevents sticking)
- Rolling pin (or just use your hands to stretch the dough)
- Sharp knife or pizza cutter (for cutting the pepperoni into leg strips)
- Small bowl (for the olive oil and garlic powder mixture)
- Pastry brush (or just use a spoon to spread the oil)
- Butter knife (for dragging the sauce to create the spiderweb pattern)
If you do not have a rolling pin, do not worry. I have used a wine bottle more times than I care to admit. It works perfectly. And if you do not have a pastry brush, you can just drizzle the oil over the crust and spread it around with the back of a spoon. I learned that trick when my brush fell apart mid-recipe, and honestly, it works just as well.
Preparation Method
Alright, let me walk you through this step by step. I have made this pizza enough times to know exactly where things can go wrong, so I am going to give you all my little tricks along the way.
Step 1: Preheat Your Oven
Set your oven to 475°F (245°C). If you have a pizza stone, put it in the oven now so it heats up. If you are using a regular baking sheet, just leave it out for now. A hot oven is crucial for getting that crispy crust and bubbly cheese. Give it at least 20 minutes to fully preheat.
Step 2: Prepare Your Dough
Take your pizza dough out of the fridge and let it sit at room temperature for about 10 minutes. Cold dough is hard to stretch and will keep snapping back on you. I learned this the hard way after fighting with a stubborn ball of dough for fifteen minutes one night.
Lightly flour your work surface and your hands. Place the dough in the center and start pressing it out with your fingertips, working from the center outward. Leave a slightly thicker edge for the crust. Once it is about 6 inches wide, you can pick it up and use your knuckles to stretch it further, letting gravity do some of the work. You want a roughly 12-inch circle, but it does not have to be perfect. My pizzas always look a little irregular, and honestly, that makes them more charming.
Transfer the stretched dough to your baking sheet or pizza pan. If you are using parchment paper, place the dough on the paper first and then transfer the whole thing to the pan. This makes cleanup a breeze.
Step 3: Create the Spiderweb Sauce Pattern
This is the fun part. Spoon about 1/3 cup of pizza sauce onto the center of the dough. Use the back of the spoon to spread it in a spiral pattern, starting from the center and working outward in a circle. Leave about an inch of bare dough around the edge for the crust.
Now, here is the trick for the spiderweb: take a small spoon and drizzle thin lines of sauce from the center to the edge, like spokes on a wheel. You want about 8 to 10 spokes. Then, take a butter knife and gently drag it in a curve from one spoke to the next, working your way around the pizza. This creates the classic spiderweb pattern. Do not press too hard—you just want to drag a thin line of sauce, not cut through the dough. If it looks messy, that is fine. The cheese will cover most of it anyway, and the web effect will still show through.
Step 4: Add the Cheese
Sprinkle the shredded mozzarella evenly over the sauce, leaving the crust edge bare. Use about 1 3/4 cups of the cheese now. Reserve the remaining 1/4 cup for later. Make sure the cheese covers the sauce completely, but do not pile it too thick in the center—you want the spiderweb pattern to be visible after baking.
Step 5: Prepare the Spider
This is where the magic happens. Take your pepperoni slices and cut each one into thin strips, about 1/4 inch wide. You want each slice to become 4 to 6 leg strips. I usually cut each slice into quarters or fifths, depending on the size of the slice.
Arrange the pepperoni strips on the pizza to form a spider shape. Place a cluster of strips in the center of the pizza to form the body—about 6 to 8 strips grouped together. Then, arrange the remaining strips radiating outward from the body to form the legs. You want 8 legs total, so use 4 strips on each side. Tuck the ends of the strips slightly under the cheese so they stay in place during baking. This is the technique I discovered during that late-night experiment, and it makes all the difference.
For the spider’s eyes, place two small black olive slices near the front of the spider body. Press them gently into the cheese so they stay put.
Step 6: Add the Finishing Touches
Drizzle the remaining 1/4 cup of cheese around the spider to help anchor it. Brush the exposed crust edges with the olive oil and garlic powder mixture. This will give you a golden, flavorful crust that looks like it came from a pizzeria.
Step 7: Bake the Pizza
Place the pizza in the preheated oven and bake for 12 to 15 minutes. Start checking at the 12-minute mark. You want the cheese to be fully melted and bubbly, the crust to be golden brown, and the pepperoni legs to be slightly curled and crispy around the edges. The spiderweb pattern should be visible through the cheese, with darker sauce lines creating the web effect.
If you are using a pizza stone, slide the pizza directly onto the stone using parchment paper or a pizza peel. If using a baking sheet, just place the sheet in the oven.
Step 8: Cool and Serve
Let the pizza cool on the pan for 3 to 5 minutes before slicing. This allows the cheese to set slightly so the spiderweb pattern stays intact when you cut it. Use a pizza cutter or sharp knife to slice into wedges. Serve warm and watch the kids’ faces light up.
Cooking Tips and Techniques
I have made this pizza enough times to collect a few hard-won lessons. Here are the tips that will save you from my mistakes.
Do not overwork the dough. I cannot stress this enough. If you keep stretching and re-stretching the dough, it will become tough and dense. Work quickly and gently. If the dough keeps snapping back, let it rest for 5 minutes and try again. The gluten needs a moment to relax.
The pepperoni leg trick. The first time I made this, I just laid whole pepperoni slices on top of the cheese. They slid right off when I tried to slice the pizza. Cutting them into strips and tucking them under the cheese is the game-changer. The cheese acts like glue, holding the legs in place while they crisp up beautifully.
Watch your oven closely. Every oven runs differently. My old oven would burn the crust at 475°F, so I had to drop it to 450°F and bake a few minutes longer. Check your pizza at the 10-minute mark and rotate the pan if one side is browning faster. Burnt crust is a tragedy, especially when you have put this much effort into the spider design.
Let the kids help. I know this is a cooking tip section, but honestly, the best tip I can give you is to let your kids arrange the pepperoni legs. My three-year-old has placed every single spider on every single pizza since that first night. It takes longer. It is messier. But the pride on their face when they see their spider come out of the oven is worth every extra minute. Plus, kids are way more likely to eat something they helped create.
Double the recipe. If you are feeding more than two kids and two adults, make two pizzas. One spider pizza disappears fast. I learned this the hard way when I brought a single pizza to a playdate and had to watch six kids fight over the last slice with the spider eyes on it.
Variations and Adaptations
One of the best things about this recipe is how easy it is to customize. Here are some variations I have tried and loved.
Vegetarian Spider Pizza
Skip the pepperoni and use strips of roasted red pepper or sun-dried tomato for the legs. The red color still gives that spooky, bloody look, and the flavor is amazing. I made this version for a vegetarian friend’s kids, and they ate every bite. You can also use strips of zucchini or eggplant if you want to sneak in some vegetables.
Gluten-Free Version
Use your favorite gluten-free pizza dough or a pre-made gluten-free crust. The technique is exactly the same. I have tested this with both store-bought and homemade gluten-free dough, and it works beautifully. Just keep an eye on the baking time—gluten-free crusts often need a few extra minutes to get crispy.
Different Spider Designs
Do not limit yourself to one spider. I have made pizzas with two small spiders on one pizza, a giant spider that takes up the whole surface, and even a spider family with tiny baby spiders made from mini pepperonis. You can also make the spider body from a whole black olive or a mushroom cap for a different look.
Cheese Lover’s Version
Add extra cheese varieties for more flavor. I have used a mix of mozzarella, provolone, and a little bit of cheddar for a sharper taste. The cheddar adds a beautiful orange color that contrasts nicely with the red sauce web.
Make It Ahead
You can assemble the pizza completely (minus the olive oil brush on the crust) and refrigerate it for up to 4 hours before baking. Just cover it loosely with plastic wrap. When you are ready to bake, brush the crust with oil and pop it in the oven. This is perfect for busy weeknights or Halloween parties.
Serving and Storage Suggestions
This pizza is best served warm, right out of the oven, when the cheese is still stretchy and the pepperoni legs are at their crispiest. I like to serve it with a simple side salad or some carrot sticks to balance out the indulgence. For Halloween parties, I arrange the pizza slices on a platter with extra black olives scattered around for a spooky effect.
The spiderweb pattern shows up best when the pizza is whole, so I recommend showing it off to your kids or guests before slicing. Let everyone admire the spider before you cut into it. It is a small moment of magic that makes the whole thing worth it.
Storage: Leftover pizza keeps well in the refrigerator for up to 3 days. Store it in an airtight container or wrap it tightly in aluminum foil. The pepperoni legs might soften a bit, but the flavor is still great.
Reheating: For best results, reheat leftover slices in a 375°F oven for 5 to 7 minutes, or in an air fryer at 350°F for 3 to 4 minutes. The microwave works in a pinch, but the crust will be soft rather than crispy. I have also reheated slices in a skillet on the stovetop—just cover the pan with a lid and heat over medium-low for a few minutes. The bottom gets crispy again while the cheese melts perfectly.
Freezing: You can freeze the unbaked pizza for up to 2 months. Assemble the pizza on a parchment-lined baking sheet and freeze until solid, then wrap it tightly in plastic wrap and foil. When you are ready to bake, do not thaw—just add a few extra minutes to the baking time. I have done this for Halloween parties, and it is a lifesaver.
The flavors actually develop a bit overnight. I have eaten cold leftover spider pizza for breakfast more times than I want to admit, and it is always delicious. Something about the pepperoni and cheese melding together in the fridge makes it even better the next day.
Nutritional Information and Benefits
Let me be real with you—this is pizza. It is not health food. But it is made with real ingredients, and that counts for something. Here is the estimated nutritional breakdown for one slice (based on 8 slices per pizza):
| Nutrient | Amount per Slice |
|---|---|
| Calories | 280 |
| Total Fat | 12g |
| Saturated Fat | 5g |
| Cholesterol | 25mg |
| Sodium | 620mg |
| Total Carbohydrates | 30g |
| Dietary Fiber | 2g |
| Sugars | 3g |
| Protein | 14g |
| Calcium | 200mg |
| Iron | 2mg |
The mozzarella cheese provides a good amount of calcium and protein, which is great for growing kids. The tomato sauce offers lycopene, an antioxidant that supports heart health. And the olive oil adds healthy monounsaturated fats. If you want to boost the nutritional value, you can add finely chopped spinach or bell peppers under the cheese—they disappear into the pizza and kids never notice.
This recipe contains gluten (from the dough) and dairy (from the cheese). If you have allergies, use the gluten-free or dairy-free variations I mentioned earlier. The pepperoni is processed meat, so if you are watching sodium intake, look for reduced-sodium pepperoni or use turkey pepperoni instead.
Honestly, I do not stress about the nutrition on this one. It is a fun dinner, not an everyday meal. The joy on my kid’s face when he sees his spider pizza is worth every calorie. Sometimes food is about more than nutrients—it is about connection, creativity, and making memories around the table.
Conclusion
This Kid-Approved Spooky Spiderweb Pizza with Pepperoni Legs started as a late-night experiment born from desperation and a half-empty fridge. Now it is a staple in our home, a recipe that my kid requests by name and that I genuinely enjoy making. It is proof that you do not need fancy ingredients or special skills to create something magical for your family. Just pizza dough, pepperoni, a little creativity, and maybe a quiet kitchen at 11 PM.
I hope you make this pizza with your kids. I hope you let them arrange the pepperoni legs and place the olive eyes. I hope you take a picture before you slice into it, because that spider looks amazing for about five minutes before it becomes dinner. And I hope you sit down together, eat warm pizza, and laugh about the silly spider you created.
If you make this recipe, I would love to hear about it. Leave a comment below and tell me about your spider design. Did your kids help? Did they eat the legs first? Share your photos on Pinterest and tag me—I want to see your spooky creations. And if you have your own variation or trick for making it even better, please share that too. We are all in this together, trying to make dinner fun without losing our minds.
Now go make some spider pizza. Your kids will thank you. And honestly, you will thank yourself too.
Frequently Asked Questions
Can I use pre-made pizza crust instead of dough?
Absolutely. Pre-made crusts like Boboli work great. Just reduce the baking time by 3 to 5 minutes since they are already partially cooked. The spiderweb pattern might be slightly less defined, but it will still look great.
How do I keep the pepperoni legs from falling off?
Tuck the ends of the pepperoni strips under the cheese before baking. The melted cheese acts like glue and holds them in place. I also add a little extra cheese on top of the legs to anchor them further.
Can I make this pizza dairy-free?
Yes. Use dairy-free shredded mozzarella and a dairy-free pizza dough. The technique is exactly the same. Just note that dairy-free cheese often melts differently, so the spiderweb effect might be less stretchy. It will still taste great.
How far in advance can I make this pizza?
You can assemble the pizza up to 4 hours ahead and refrigerate it. Just brush the crust with oil right before baking. You can also freeze the unbaked pizza for up to 2 months. Bake from frozen, adding 5 to 7 minutes to the cooking time.
What if my kids do not like pepperoni?
No problem. Use strips of cooked sausage, ham, or even hot dogs for the legs. For a vegetarian option, try roasted red pepper strips or sun-dried tomatoes. The spider design works with any thin, flexible ingredient.
Pin This Recipe!

Kid-Approved Spooky Spiderweb Pizza with Pepperoni Legs
A fun and easy Halloween pizza featuring a spiderweb design made with sauce and cheese, plus pepperoni legs that curl up during baking. Perfect for picky eaters and guaranteed to delight kids and adults alike.
- Prep Time: 15 minutes
- Cook Time: 15 minutes
- Total Time: 30 minutes
- Yield: 8 servings 1x
- Category: Main Course
- Cuisine: American
Ingredients
- 1 pound store-bought or homemade pizza dough
- 1/2 cup pizza sauce
- 2 cups shredded whole-milk mozzarella cheese
- 1 tablespoon olive oil
- 1/4 teaspoon garlic powder (optional)
- 8 to 10 slices pepperoni
- 2 small black olives (for eyes)
Instructions
- Preheat oven to 475°F (245°C). If using a pizza stone, place it in the oven to heat.
- Let pizza dough sit at room temperature for 10 minutes. Lightly flour a work surface and stretch dough into a 12-inch circle. Transfer to a baking sheet or pizza pan.
- Spoon about 1/3 cup pizza sauce onto the center of the dough and spread in a spiral pattern, leaving a 1-inch border for the crust. Drizzle thin lines of sauce from center to edge like spokes, then drag a butter knife in curves from one spoke to the next to create a spiderweb pattern.
- Sprinkle 1 3/4 cups mozzarella evenly over the sauce, reserving 1/4 cup for later.
- Cut pepperoni slices into thin strips (about 1/4 inch wide). Arrange a cluster of strips in the center for the spider body, then arrange remaining strips radiating outward for 8 legs. Tuck ends of strips under the cheese. Place two olive slices near the front for eyes.
- Drizzle reserved 1/4 cup cheese around the spider. Brush crust edges with olive oil mixed with garlic powder.
- Bake for 12 to 15 minutes, until cheese is bubbly, crust is golden, and pepperoni legs are curled and crispy.
- Let cool on pan for 3 to 5 minutes before slicing. Serve warm.
Notes
For best results, use fresh pizza dough and shred mozzarella from a block (pre-shredded cheese contains anti-caking agents that reduce stretch). Tuck pepperoni strips under the cheese to keep them attached. Let kids help arrange the spider legs for extra fun. Double the recipe for larger groups.
Nutrition
- Serving Size: 1 slice
- Calories: 280
- Sugar: 3
- Sodium: 620
- Fat: 12
- Saturated Fat: 5
- Carbohydrates: 30
- Fiber: 2
- Protein: 14
Keywords: spider pizza, Halloween pizza, kid-friendly pizza, pepperoni pizza, spiderweb pizza, fun dinner, easy pizza



